
Leaks on your RV roof can be a real headache, whether you’re parked for a weekend adventure or living on the road full time. Water damage is one of the worst issues you can face with your RV because even a small leak can lead to big problems like mold, rot, and expensive repairs. Spotting leaks early and learning how to handle repairs on your RV roof will protect your investment and keep your home on wheels comfortable and dry.
Why Leak Repairs on Your RV Roof Matter
RV roof leaks are surprisingly common, especially as your rig ages or if it’s often stored outside. The materials used for RV roofs, such as rubber (EPDM or TPO), fiberglass, or aluminum, are designed to stand up to the elements. However, constant exposure to sun, rain, and temperature changes can eventually break down their barriers. Once water finds its way in, it sneaks under the surface and causes damage fast. Prevention and repair both play a big role in saving you money and stress.
Routine inspections and quick repairs will help you avoid costly replacements later. Water damage is not always visible right away, so keeping up with leak repair chores is a smart move for anyone who wants to extend the life of their RV. I always tell fellow RV owners: A little work now can save you way more trouble in the future.
In fact, regular attention to your roof doesn’t just keep your RV dry. It can also help preserve the structural integrity of your rig, keep resale value higher, and even improve insulation against heat and cold. Many experienced RVers agree that the roof is the number one place to check for vulnerability, especially after storms or if your RV is parked under trees where debris can gather. Just spending a bit of time on maintenance each month pays off big time in prevention.
How to Spot a Roof Leak on Your RV
Finding a leak might sound obvious, but not all leaks announce themselves with a steady drip right above your pillow. Many start small, showing only subtle signs before turning into a major issue. Here are a few clues that your RV roof might be leaking:
- Water Stains: Look for brown or yellowish spots on your ceiling, walls, or around roof vents.
- Soft Spots: Press gently on the ceiling and roof. Areas that feel mushy or spongy could mean hidden water damage.
- Bubbling Wallpaper or Sagging Ceiling Panels: These are signs that water has seeped in and is pooling behind the surface.
- Mold or Mildew Smell: A musty odor inside your RV indicates moisture is hanging around where it shouldn’t be.
- Visible Gaps or Cracks: Check all seams, roof edges, skylights, vents, antenna bases, and accessories for cracked sealant or open seams.
It’s pretty handy to use a ladder and get up close when inspecting the roof. Just be careful and make sure the roof can bear your weight. Some roofs are walkable, but always check your manual if you’re not sure about yours.
Some leaks aren’t obvious from inside at all. Sometimes you can spot evidence like streaks down the outside panels of the RV, or even a slightly warped panel on the inside. For newer RVers, it’s helpful to check for leaks not only after heavy rain, but also when returning from long trips or after driving on rough or windy roads—vibration and wind can loosen seams quicker than you might think.
Common Causes of RV Roof Leaks
Knowing what typically causes leaks helps you zero in on weak spots and spot patterns before they escalate:
- Aging Sealant: Most leaks happen where sealant has cracked, shrunk, or pulled away due to age or movement.
- Physical Damage: Tree branches, hail, debris, or even walking on your roof can create tiny punctures or tears.
- Poor Installation: Cheap or rushed jobs for vents, skylights, or aftermarket accessories can leave gaps.
- UV Exposure: Sunlight breaks down both the roofing material and the sealants over time, so routine maintenance is crucial.
Understanding these common triggers helps you focus your attention on the real weak spots and catch leaks before things get out of hand.
DIYers often overlook the impact of travel vibration. Every mile you drive causes the RV to flex and shift a bit, which puts strain on sealed seams and caulk. When you combine that with sun’s UV rays drying out old sealant, even well-cared-for roofs can spring a leak with little warning. That’s why after long journeys or big weather changes, it’s smart to do a quick visual scan of your roof and upper walls—even just from a nearby ladder if you can’t get all the way up.
Getting Prepared: Tools and Products for RV Roof Leak Repairs
Gathering the right tools and repair materials before starting makes the job a lot smoother. Here’s what I keep handy for typical leak repairs:
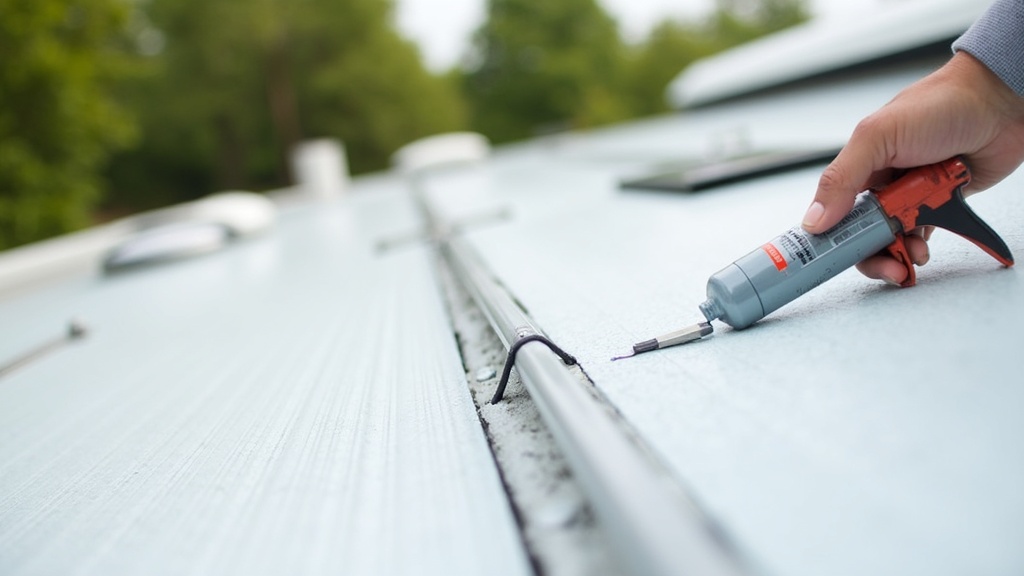
- Caulking Gun and RV Roof Sealant: Choose a sealant designed for your type of roof—EPDM, TPO, or fiberglass. Dicor and Eternabond are pretty popular choices.
- Roof Tape: RV specific roof tape can patch holes and seal seams quickly (Eternabond tape is a go to for many RVers).
- Putty Knife or Scraper: These help remove old sealant and clean the area before repairing.
- Gloves and Rags: Keeping your work area and hands clean makes the job much less messy.
- Ladder and Soft Soled Shoes: Always use a stable ladder and wear shoes that won’t damage the roof surface.
- Cleaner (non abrasive): Prepping the repair area is step one for a long lasting fix.
Having all these on hand will help you tackle most small to midsize leaks yourself, saving money and reducing the need for last minute shop visits.
It also helps to keep a roll of paper towels, some duct tape for emergencies (though not as a long term fix), a flashlight for dark or shaded areas, and a notebook to record repair dates and monitor problem spots over time. That little extra prep can really smooth the way and pay off when you’re mid job and discover you need a tool or a note for later reference.
Step by Step Guide: How I Fix Leaks on My RV Roof
I break the repair process down into straightforward steps; it’s not as intimidating as it looks! Here’s my usual approach to a roof leak:
- Inspect the Leak: Pinpoint the exact spot on the roof above where you notice water inside. Remember, water can travel, so check all nearby seams and openings carefully.
- Clean the Area: Use a soft brush or rag and mild cleaner to remove dirt, old caulking, and debris. Let the area dry thoroughly.
- Remove Old Sealant: Gently scrape away any loosened or cracked sealant with a putty knife, making sure not to gouge the underlying roof material.
- Apply New Sealant or Tape: Use your RV specific lap sealant to lay down a generous, smooth bead over seams, screw heads, and around all roof components. For small punctures or tears, roof tape pressed down securely can do wonders.
- Spread and Smooth: Use your finger (with gloves on) or a plastic spatula to smooth out the new sealant and ensure it overlaps the repair area well.
- Let it Cure: Check the instructions on your sealant. Most need at least 24 hours to fully cure; warm, dry weather will speed up the process.
- Test for Leaks: Run a hose over the repaired section or wait for a rainy day. Watch from inside for signs of water intrusion. If it leaks again, repeat the process and check for overlooked gaps.
This whole routine usually takes just a couple of hours. Taking your time with the prep and application increases the life and effectiveness of your repairs, ensuring you don’t need to redo work each season.
Preventive Maintenance: Keeping RV Roof Leaks at Bay
Regular care beats constant repair every time. Here’s how I stay ahead of leaks and keep my RV protected year round:
- Annual Roof Inspection: At least once a year (and after big storms), get up there and check every seam and opening for trouble.
- Check Sealant Twice a Year: Spring and fall are great times. Add fresh sealant anywhere you see cracks forming.
- Clear Debris Right Away: Leaves, sticks, and standing water keep moisture against the roof, so sweep them off as soon as possible.
- Keep Gutters and Drains Clear: On RVs equipped with them, clogged channels lead to standing water and faster deterioration around the edges.
- Poke Inside Cabinets and Corners: Occasionally check behind cabinets and under beds for dampness where leaks often hide.
Consistent, simple routines make it easy to protect your investment and avoid surprise breakdowns. It’s a smart habit to check your roof when you’re cleaning the exterior or after moving your RV to a different storage site—it only takes a few extra minutes and adds up to big savings on repairs.
You can also set reminders on your phone for spring and fall inspections, and carry a small repair kit on board. That way, if you notice damage or a weak spot while traveling, quick patching is always possible before things get worse. Preventive care really is the key to a long lasting RV roof.
Types of RV Roofs and Repair Differences
Different roof types call for slightly different materials and repair techniques:
- EPDM Rubber Roofs: These are common and easy to patch using rubber compatible sealant or special repair tape. Avoid petroleum based products, as they reduce the roof’s lifespan.
- TPO Roofs: These are a bit tougher than EPDM, yet still flexible. They need RV specific cleaners and adhesives for best results.
- Fiberglass Roofs: These are hard, sleek, and durable but can crack or develop seam leaks. Flexible caulk and fiberglass compatible sealants do the job well.
- Aluminum Roofs: Mostly found on older rigs, they’re patchable, but it’s best to use aluminum specific products so repairs last.
Always check your owner’s manual or manufacturer’s advice before picking up sealants or tape; using the wrong product can cause issues and make repairs ineffective. Each roof material has unique properties, so the right match is crucial for long term results. Owners of customized RVs might need to check with the installer or previous owner for the precise material to use.
It’s also worth noting that some modern coatings can be applied on more than one type of surface, but you should double check labeling and online reviews for compatibility. The right approach to your RV roof material makes all the difference when facing tough weather.
Frequently Asked Questions
RV roof leaks are a big topic, and I get plenty of questions about them. Here are a few that come up often:
Question: How often should I check my RV roof for leaks?
Answer: Twice a year is the bare minimum, but more often if you’re parked under trees, travel a lot, or spot any signs of trouble inside your RV. Don’t wait for a problem to show itself!
Question: Can I drive with a temporary roof patch or tape?
Answer: Yes, roof repair tape like Eternabond can hold up well in travel as long as it’s applied to a clean, dry surface. Still, it’s best to make permanent repairs as soon as you can.
Question: Do DIY repairs void the RV’s warranty?
Answer: Some warranties require authorized service for roof repairs, especially if your RV is still pretty new. Always check the fine print before doing your own repairs during the warranty period.
Question: Is it worth getting a professional to inspect or fix leaks?
Answer: If you’re not comfortable climbing on the roof or dealing with larger, hidden leaks, paying a professional can be worth it. Small maintenance jobs are DIY friendly and can save a lot of money.
Question: What’s the difference between roof sealant and roof tape?
Answer: Roof sealant is a liquid or paste applied to seams, screws, and gaps. It’s great for creating a watertight barrier over irregular shapes and edges. Roof tape, like Eternabond, is a sticky strip that’s pressed over cracks and joints—excellent for larger holes or emergency fixes. For the best results, many RVers use both, applying sealant to edges and tape for big gaps or single punctures.
Question: How long does a typical roof repair last?
Answer: A quality patch or bead of sealant can last several years if applied correctly. However, sun, wind, and constant driving all gradually break it down, so regular follow up maintenance is key to long lifespan.
Troubleshooting Repair Challenges
Not every leak is straightforward. Sometimes water appears inside far from the actual breach, or repairs just don’t hold up. Here are some tips that have helped me through tricky leaks:
- If you struggle to find the leak’s entry point, use a helper with a hose and soak sections of the roof while you watch inside for drips or damp spots.
- For leaks at roof accessories like A/C units, remove the shroud and check gaskets. Add extra sealant around the base for more protection.
- If patches keep failing, the roof material or old damage might be too far gone; it’s time to get a pro for a thorough inspection and advice.
Stubborn leaks usually just need a closer look and patience to get right. Sometimes, taking a few photos of the roof and interior damage then comparing after each fix helps spot tricky water paths. Also, note the weather and travel patterns leading up to the leak—this can provide helpful clues.
Upgrading for Longer Term Protection
If your RV is several years old, it could be worth considering roof coatings or upgrades for better leak prevention and peace of mind. Here’s what works best:
- Elastomeric Roof Coating: This acts like a waterproof blanket over the entire roof. It’s a good refresh for aging rubber or fiberglass roofs and can last years with proper application.
- UV Resistant Sealants: Newer sealants resist sun damage much better. They work great for high exposure areas and moving joints.
- Replacement Roofs: Though it’s a big job, sometimes a new membrane gives your RV a fresh start, especially if there has been widespread water damage before.
All of these upgrades are investments, but they add real peace of mind for RVers planning to keep their rig in great shape for years. A consistent schedule of refinishing every few years and using high quality products can mean the difference between enjoying your RV or facing costly repairs down the road.
Choosing Products and Brands: A Shopper’s Guide
I’ve tested a bunch of sealants, tapes, and repair kits over my years of RVing. Here are a few stand out options for keeping leaks in check:
- Dicor Lap Sealant: Easily the most popular, it stays flexible for years, which really matters since RV roofs flex a lot.
- Eternabond Tape: Sticks to just about any surface and gives a quick, lasting seal. It’s always in my tool kit.
- ProFlex RV Sealant: Great for more rigid surfaces or areas with a lot of stress.
- Henry TropiCool Silicone Roof Coating: A solid choice for a whole roof refresh; it’s bright white and UV reflective.
You can pick these up at Amazon, Camping World, or specialty RV suppliers. Always make sure to check product compatibility with your specific roof before applying anything. Spending a little more on trusted names usually pays off with longer periods between repairs and fewer leaks overall.
Buyers should also compare expiration dates, customer reviews, and ask around at RV forums or local groups for recommendations based on real life experiences. Product ratings change as companies improve their formulas, so the best choice one year can have tough competition the next. A little research saves a lot of hassle down the road.
Real World Example: My Most Memorable Leak Repair
One memorable time, my RV sprang a leak right above the bedroom skylight during a weeklong rainstorm. It started with a tiny stain, then water started dripping into the closet. I followed all the steps: cleaned off the loose caulk, applied new lap sealant around the whole skylight and vent, and topped it off with roof tape for extra security. The whole repair took a few hours and needed lots of patience, but when the next big storm rolled in, the inside stayed bone dry. That fix really reminded me how simple repairs done the right way can hold strong even through the worst weather conditions.
Leaks happen to every RVer eventually, but with a bit of know how, the right tools, and a willingness to do some rooftop work, they’re not as intimidating as you might think. Staying ahead of roof leaks keeps your travels safe, your repairs manageable, and your RV feeling like home in any weather. Make regular inspections and quick patches part of your routine, and you’ll spend more time enjoying life on the road instead of worrying about water damage.