
Dealing with unreliable tank sensors is a pretty common headache if you own an RV. When your fresh, gray, or black water sensors start acting up, you’re left guessing about your levels, and nobody wants that kind of surprise halfway through a trip. I’ve been there myself, and knowing what actually helps can save a ton of stress, not to mention cleanup. In this guide, I’m breaking down what you can do about bad RV tank sensors and how to stay one step ahead of frustrating reading errors. If you’re tired of playing the guessing game with your RV’s holding tanks, this article will give you practical tips, tricks, and gear recommendations for handling those sensors once and for all.

Understanding RV Tank Sensors and Why They Fail
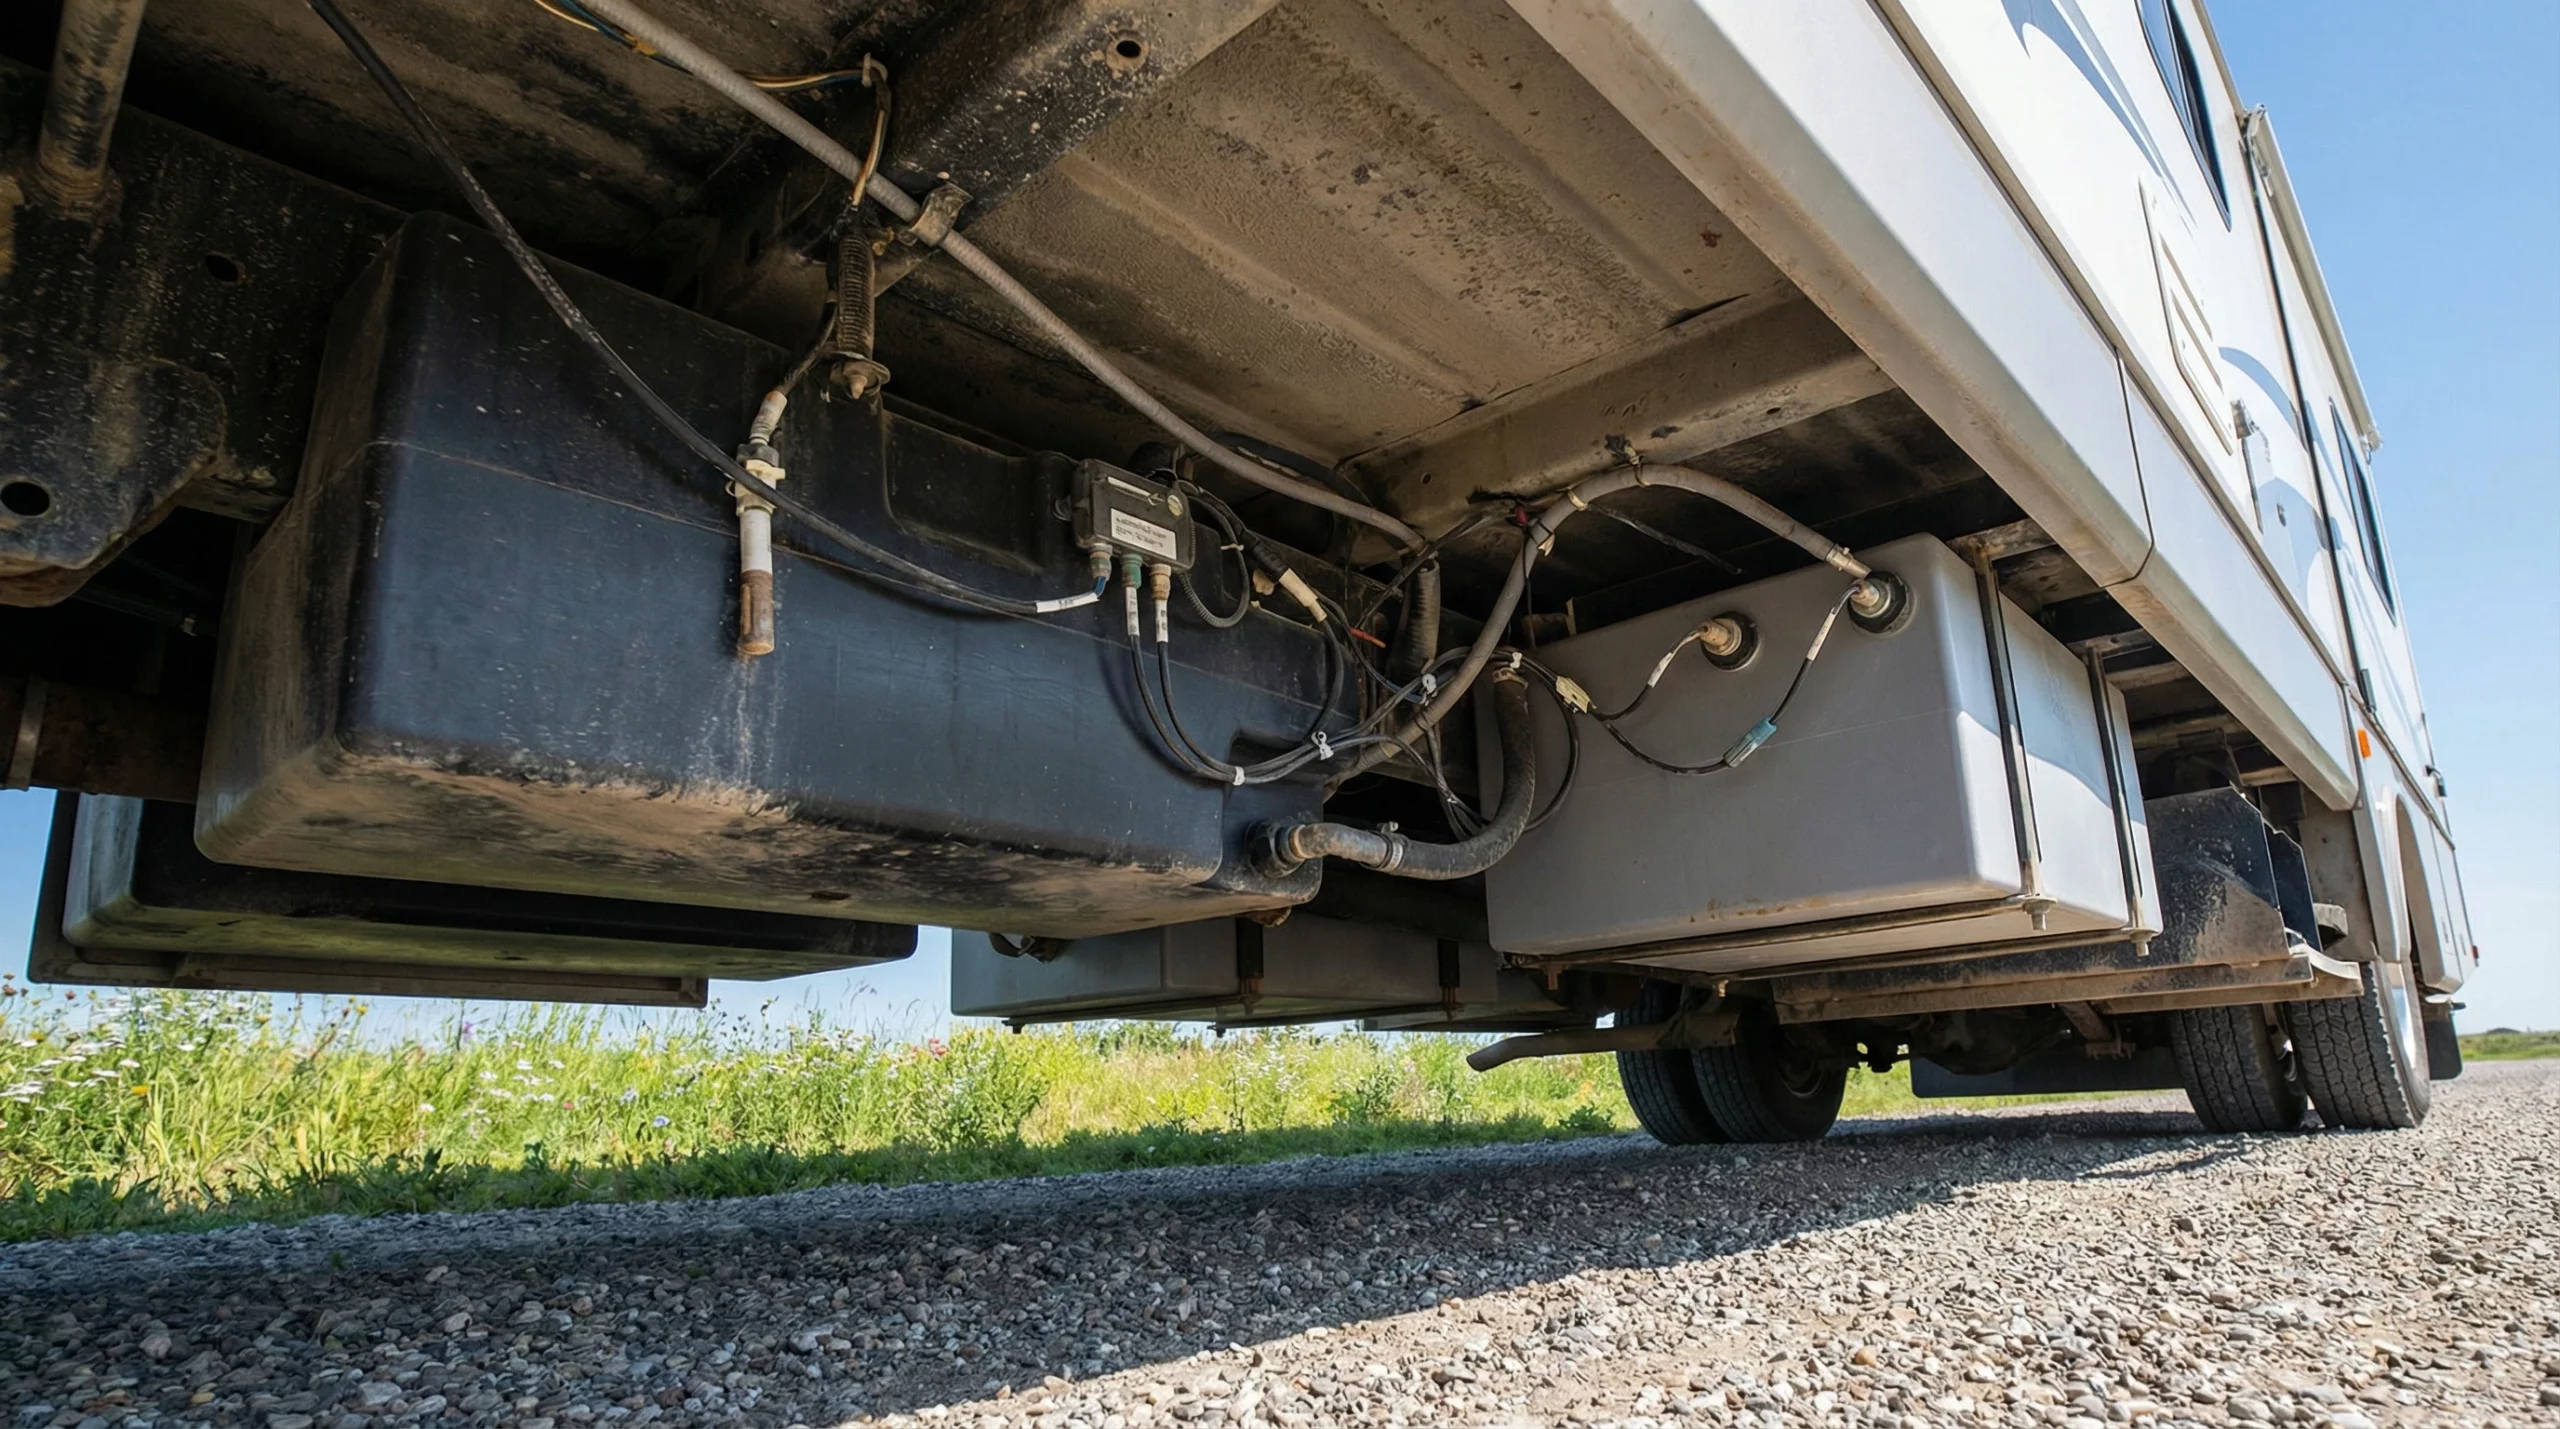
Tank sensors seem simple on the surface: they’re there to estimate how full or empty your water and waste tanks are. But trust me, there’s a lot going on behind the scenes, and plenty that can go sideways. Most RVs use probes installed through the side of each holding tank. As the liquid covers these probes, an electrical signal completes and lights up those indicator lights inside your RV.
It sounds simple, but in reality, gunk, mineral buildup, and even toilet paper can cause the sensors to give false readings. Suddenly your empty tank flashes as full, or your monitor panel refuses to budge from half full. Different manufacturers use slightly different sensor designs, but sidemounted throughthewall probes (often with three or four levels) are the most common on travel trailers and motorhomes built in the last couple of decades. A smaller number of RVs now use more advanced tech like external ultrasonic sensors or senders attached to the tank’s surface.
RVs might come with fancier setups, but even highend models can develop problems over time. Even rain or temperature changes may play a role in sensor function if tanks or sensors aren’t well protected.
Common Symptoms of Bad RV Tank Sensors
If you’re new to RVing, here’s what typical bad sensor behavior looks like:
- False “Full” Alerts: Your black or gray tank claims to be full even right after you empty it.
- Stuck on One Level: The indicator shows half full, no matter if you just dumped or filled the tank.
- No Response: The panel lights don’t light up for one or more tanks.
- Random Fluctuations: The reading jumps from empty to full (or vice versa) in a short span, with no way you actually used or dumped that much.
Sensors throwing out wrong readings can trip up your rhythm, especially in boondocking situations when knowing your levels is honestly pretty important.
Sometimes sensors signal “full” even if you just dumped the tanks; other times, a single button lights up and won’t move. If you’re dealing with repeated strange behavior, don’t worry—there’s always a cause, and usually a fix.
What Causes Tank Sensor Problems?
Most RV tank sensor headaches come down to buildup: stuff sticking to the probes and tricking the system into showing wrong levels. Here are some specific culprits:
- Grease & Soap Scum (Gray Water): Dishwashing residue can coat probes. Even “dishwashersafe” liquids sometimes collect over time.
- Toilet Paper & Waste (Black Water): Even RVsafe paper sometimes gets caught on sensor probes, especially in smaller tanks or if you don’t use much water to flush.
- Mineral Deposits (Fresh Water): Hard water can leave a residue on fresh tank sensors if not flushed occasionally.
- Mechanical Failure: Wiring breaks, panels go bad, or the probe gets physically damaged (not common, but it happens).
Understanding the likely source makes it easier to fix, or avoid, ongoing trouble. When in doubt, start simple: the most common issue is gunk buildup and not actual probe failure.
First Steps: Diagnosing the Problem
Before grabbing any cleaners or replacement parts, it helps to take a minute to confirm where the issue actually lives. I usually start with a quick check:
- Check the Monitor Panel: Try reading each tank with the button or switch. If just one tank’s stuck, it’s probably buildup. If all tanks read wrong, you might have a wiring issue or a bad panel.
- Physical Lookover: Head outside and look for any damage on the wiring running to the tanks. Road debris or critters can sometimes cause surprise breaks.
- Ask Yourself: Has it been a while since you cleaned or treated your tanks? If so, a good cleaning could help.
Sometimes, the monitor panel fails and gives false readings for multiple tanks at once. Doublecheck both the panel and tank connections to narrow down the problem.
Simple Solutions: Cleaning Your Tank Sensors
You don’t always need fancy tools or a repair shop to get sensors working again. Gunk removal—a good tank cleanout—helps most of the time. Here’s how I usually tackle it:
- Use a Tank Cleaning Solution: There are lots of options out there like Camco’s TST or Unique’s Sensor Cleaner, which are designed to break down grease, residue, and paper.
- DIY Cleaning Mix: Pour a cup of dishwasher detergent (the powder type, not the stuff for handwashing) into the tank, then add several gallons of hot water. Drive around for half an hour, letting it slosh. Finally, dump and rinse.
- Ice Cube Trick: Some RVers swear by tossing a big bag of ice cubes in the (empty) black tank with a few gallons of water, then driving around. The theory is the moving ice scrubs the probes as you go.
For consistent trouble, you may want to make tank cleaning a regular habit, at least every few trips, more if you use your RV a lot. If you travel where water is hard, you might need to clean fresh tanks more often, as mineral buildup can get stubborn over time.
Routine Tank Care to Prevent Sensor Issues
- Use Adequate Water: Especially in the black tank, always use more water with each flush. Dry material gets stuck on probes faster if things aren’t diluted.
- Avoid Throwing Non-Dissolving Items: Sticking to singleply, RVspecific toilet paper helps, but I’ve seen good results with plain singleply from big box stores too.
- Run Regular Rinses: If you have a tank flush system, run it every time you dump. If not, hook up a hose and rinse from the toilet (using a tank wand is pretty handy).
- Enzyme Treatments: Some treatments not only mask smells, but help break down waste and paper, making it less likely to build up.
Adding enzyme treatments regularly and giving tanks a full rinse after every trip can keep those sensors working better for the long haul. If you dry camp, consider tracking your usage and rinsing tanks nearly every time you fill with fresh water.
When Cleaning Doesn’t Work: Troubleshooting Persistent Problems
If even after serious cleaning, your sensors are still wrong, you might have a wornout or broken probe. Here’s how you can narrow that down:
- Check Wiring: Make sure wires leading to the tank probes are connected and undamaged.
- Look for Corrosion: Inspect probe bases where they meet the tank for signs of rust or corrosion.
- Test for Leaks: Leaks around the probe or sender can cause interference and bad readings. If the outside of the tank is wet or looks like it’s “sweating” right near the sender, that’s a clue.
Swapping out a bad probe is a bit of a project, but if you’re handy and the tank is accessible, it’s totally doable. Otherwise, this is a fix most RV service shops handle pretty routinely.
Some sensors just get old—materials degrade, or connections corrode with age. Before swapping sensors, always triplecheck for loose connections, dirty or corroded wires, and signs of leaks on or near the tank’s sidewall.
Upgrading to Better Tank Sensors
Original tank sensors with sidewall probes just aren’t that accurate, even when they’re working right. If you want something with more reliability, you have options:
- External Sensors: These ultrasoundstyle sensors stick to the outside of the tank and never touch waste or water, so they avoid buildup issues entirely. Systems like SeeLevel from Garnet Industries are popular upgrades.
- Aftermarket Internal Probes: Some replacement probe kits improve durability or use different detecting technology, but these usually can’t avoid all gunkrelated problems.
External sensors do cost more upfront and require a little DIY skill (or an installer) for setup. If you dry camp a lot or just really want a tank reading you can trust, it’s something to consider. Also, check if your RV is compatible with stickon sensors—some require tanks within certain thickness limits.
Challenges You’ll Run Into With RV Tank Sensors
- Sensor Location: In some RV models, tanks are tucked away in hardtoaccess spots. Handy if you don’t want them damaged on the road, but a pain if you have to swap sensors or clean the outside yourself.
- Aftermarket Compatibility: Not all replacement sensors fit every tank design, and tank thickness can matter with some upgrade kits.
- Seasonal Use: RVs left sitting for months can end up with driedon gunk that’s hard to dissolve later; regular use and flushing helps prevent this.
- DIY Mishaps: Accidentally overfilling the tank during the cleaning process can cause other hassles (like a mess in the RV), so keep a close eye while you’re rinsing or cleaning.
Sensor Location
Access can be a problem, especially in Class C and smaller travel trailers. Sometimes the tank is right over an axle or bracket, with only a small space to reach the probe. Flexible tools and extensions can help in tricky spots. Always doublecheck that you’re working on the correct tank before unscrewing anything. If in doubt, mark wiring or snap photos before disconnecting anything for easier reassembly.
Aftermarket Compatibility
If you’re thinking about upgrading, check tank thickness and material. Stickon ultrasonic systems work only up to a certain wall thickness and may need a totally clean surface to install. Check with manufacturer specs or RV owner forums for your model’s quirks before you buy. Asking other owners about their upgrades can save you time and expense if you run into surprises.
Seasonal Use
Sitting unused sometimes leads to driedout, stuckon buildup, which can be annoying to clean. Before and after long storage, run several fulltoempty flushes through tanks using plenty of water and tank cleaner, not just antifreeze washes. If you store in a humid climate, inspect tanks for signs of mold or mildew growth as well.
Advanced Tips for Never Getting Caught Off Guard Again
Getting accurate tank readings is part prevention, part creative troubleshooting. Here are a few extra strategies I use that make a real difference:
- Install an Inline Flush System: If you don’t already have one, these let you hook a hose right up for a deeper clean every time you dump. They aren’t expensive and make routine cleaning much less work. Some have rotating sprayer heads that blast the tank’s interior clean more effectively than manual rinsing.
- Log Tank Usage: For frequent boondocking, jot down how many days your tanks last between dumps. Even if sensors aren’t working at all, you can fall back on the numbers until you get them fixed. Keeping notes helps especially when different people use the RV, since usage patterns change.
- Add a Visual Check: In some setups, you can shine a flashlight through the plastic of the tank or check for bulges as it fills. Not perfect, but handy in a pinch if you suspect the sensor’s stuck. On older RVs with translucent polyethylene tanks, visual checks can be a good backup method, especially before long boondocking stops.
Combining prevention—regular cleaning, more water, enzyme treatments—with reliable upgrade parts means you’ll spend less time worrying about false sensor readings, and more time actually enjoying your trips. Like any part of RVing, practice and preparation go a long way toward making tank maintenance easier.
Practical Gear and Treatments for Better Sensor Performance
Tackling sensor problems doesn’t always take expensive supplies. My goto products and tools include:
- Powdered dishwasher detergent for deep cleans
- Enzymebased tank treatments to keep breakdown going after cleaning
- A flexible tank rinser wand (great for black tanks especially)
- RVdedicated hoses (never mix your drinking water hose for tank cleaning!)
Also consider a tank flush system add-on for your RV if it’s not already installed. Using gear specifically made for RV tank maintenance will make your cleaning process more effective and prevent crosscontamination with potable water systems. If you do much camping, having these on hand makes it easier to keep things running right, and you won’t have to scramble for a quick fix mid-trip.
Beyond cleaning, some RVers swear by using biodegradable tank treatments to promote good tank health. Just be sure any product you use is safe for RV plumbing and sensors. Avoid dumping nonapproved soaps, wipes, or chemicals down your drains or toilets—these can cause more harm than good to sensitive sensors and tank seals.
Frequently Asked Questions
How often should I clean my RV tanks to prevent sensor problems?
Cleaning after every few trips helps, but those who dry camp a lot or use their RV fulltime might want to deep clean tanks every month or so. Adding water and enzyme treatments after each dump is super useful to keep things breaking down between trips.
Is it safe to use household cleaners in RV tanks?
Stick to RVapproved products or mild cleaners; harsh chemicals like bleach or strong lyebased drain openers can damage tank walls, seals, and sensors. Dishwasher detergent and enzyme products are my goto choices for effective yet gentle cleaning.
Do aftermarket tank sensors work better than factory probes?
Ultrasonic, external sensor kits are way less likely to get fooled by waste and grease. They cost more but can give more precise, reliable readings if installed correctly. Doublecheck fitment for your model before buying, and follow all installation directions closely for best results.
Can I repair a broken sensor probe myself?
If you can access the tank’s side and know how to handle basic wiring, swapping a probe is pretty straightforward. Just make sure you seal around the new probe to avoid any leaks. If it’s tough to reach or you’re not comfortable, a mobile RV tech can handle it quickly.
Final Thoughts
Bad RV tank sensors can put a damper on any trip, but with regular cleaning, smart prevention, and, when needed, an upgrade to new tech, you can get accurate readings and keep your adventures rolling. Staying on top of this stuff just means less worry and more time for the good parts of RV life. With the right knowhow, gear, and a bit of patience, you won’t get caught off guard again—just good times on the road.